![]()
In this post you will know quickly the steps involved in a root canal treatment.
Now lets discuss the steps involved in Root Canal Treatment
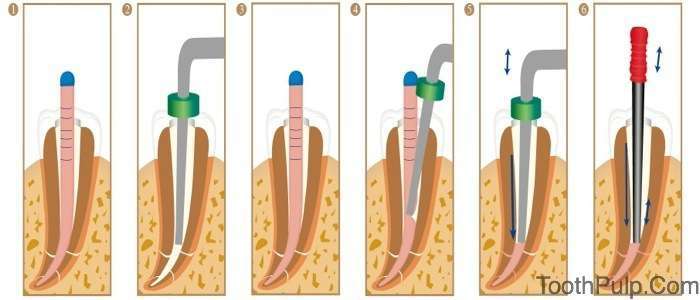
Step 1. IDENTIFICATION / PREPARATION OF THE INFECTED SITE AND RUBBER DAM APPLICATION
First the infected tooth is identified. Before starting the treatment all the preoperative tests should be done. The infected tooth is first numbed using local anesthesia. The operative tooth needs to be isolated for proper visualization and also to prevent contamination. This isolation is carried out by the application of the rubber dam.
RUBBER DAM : A “rubber” dam is really a thin sheet of latex (usually about 6 x 6 inches).
- Your dentist will punch a tiny hole near its center.
- They’ll then stretch the sheet over your tooth so it alone sticks through the punched hole.
- A metal clamp is then positioned to hold the dam in place.
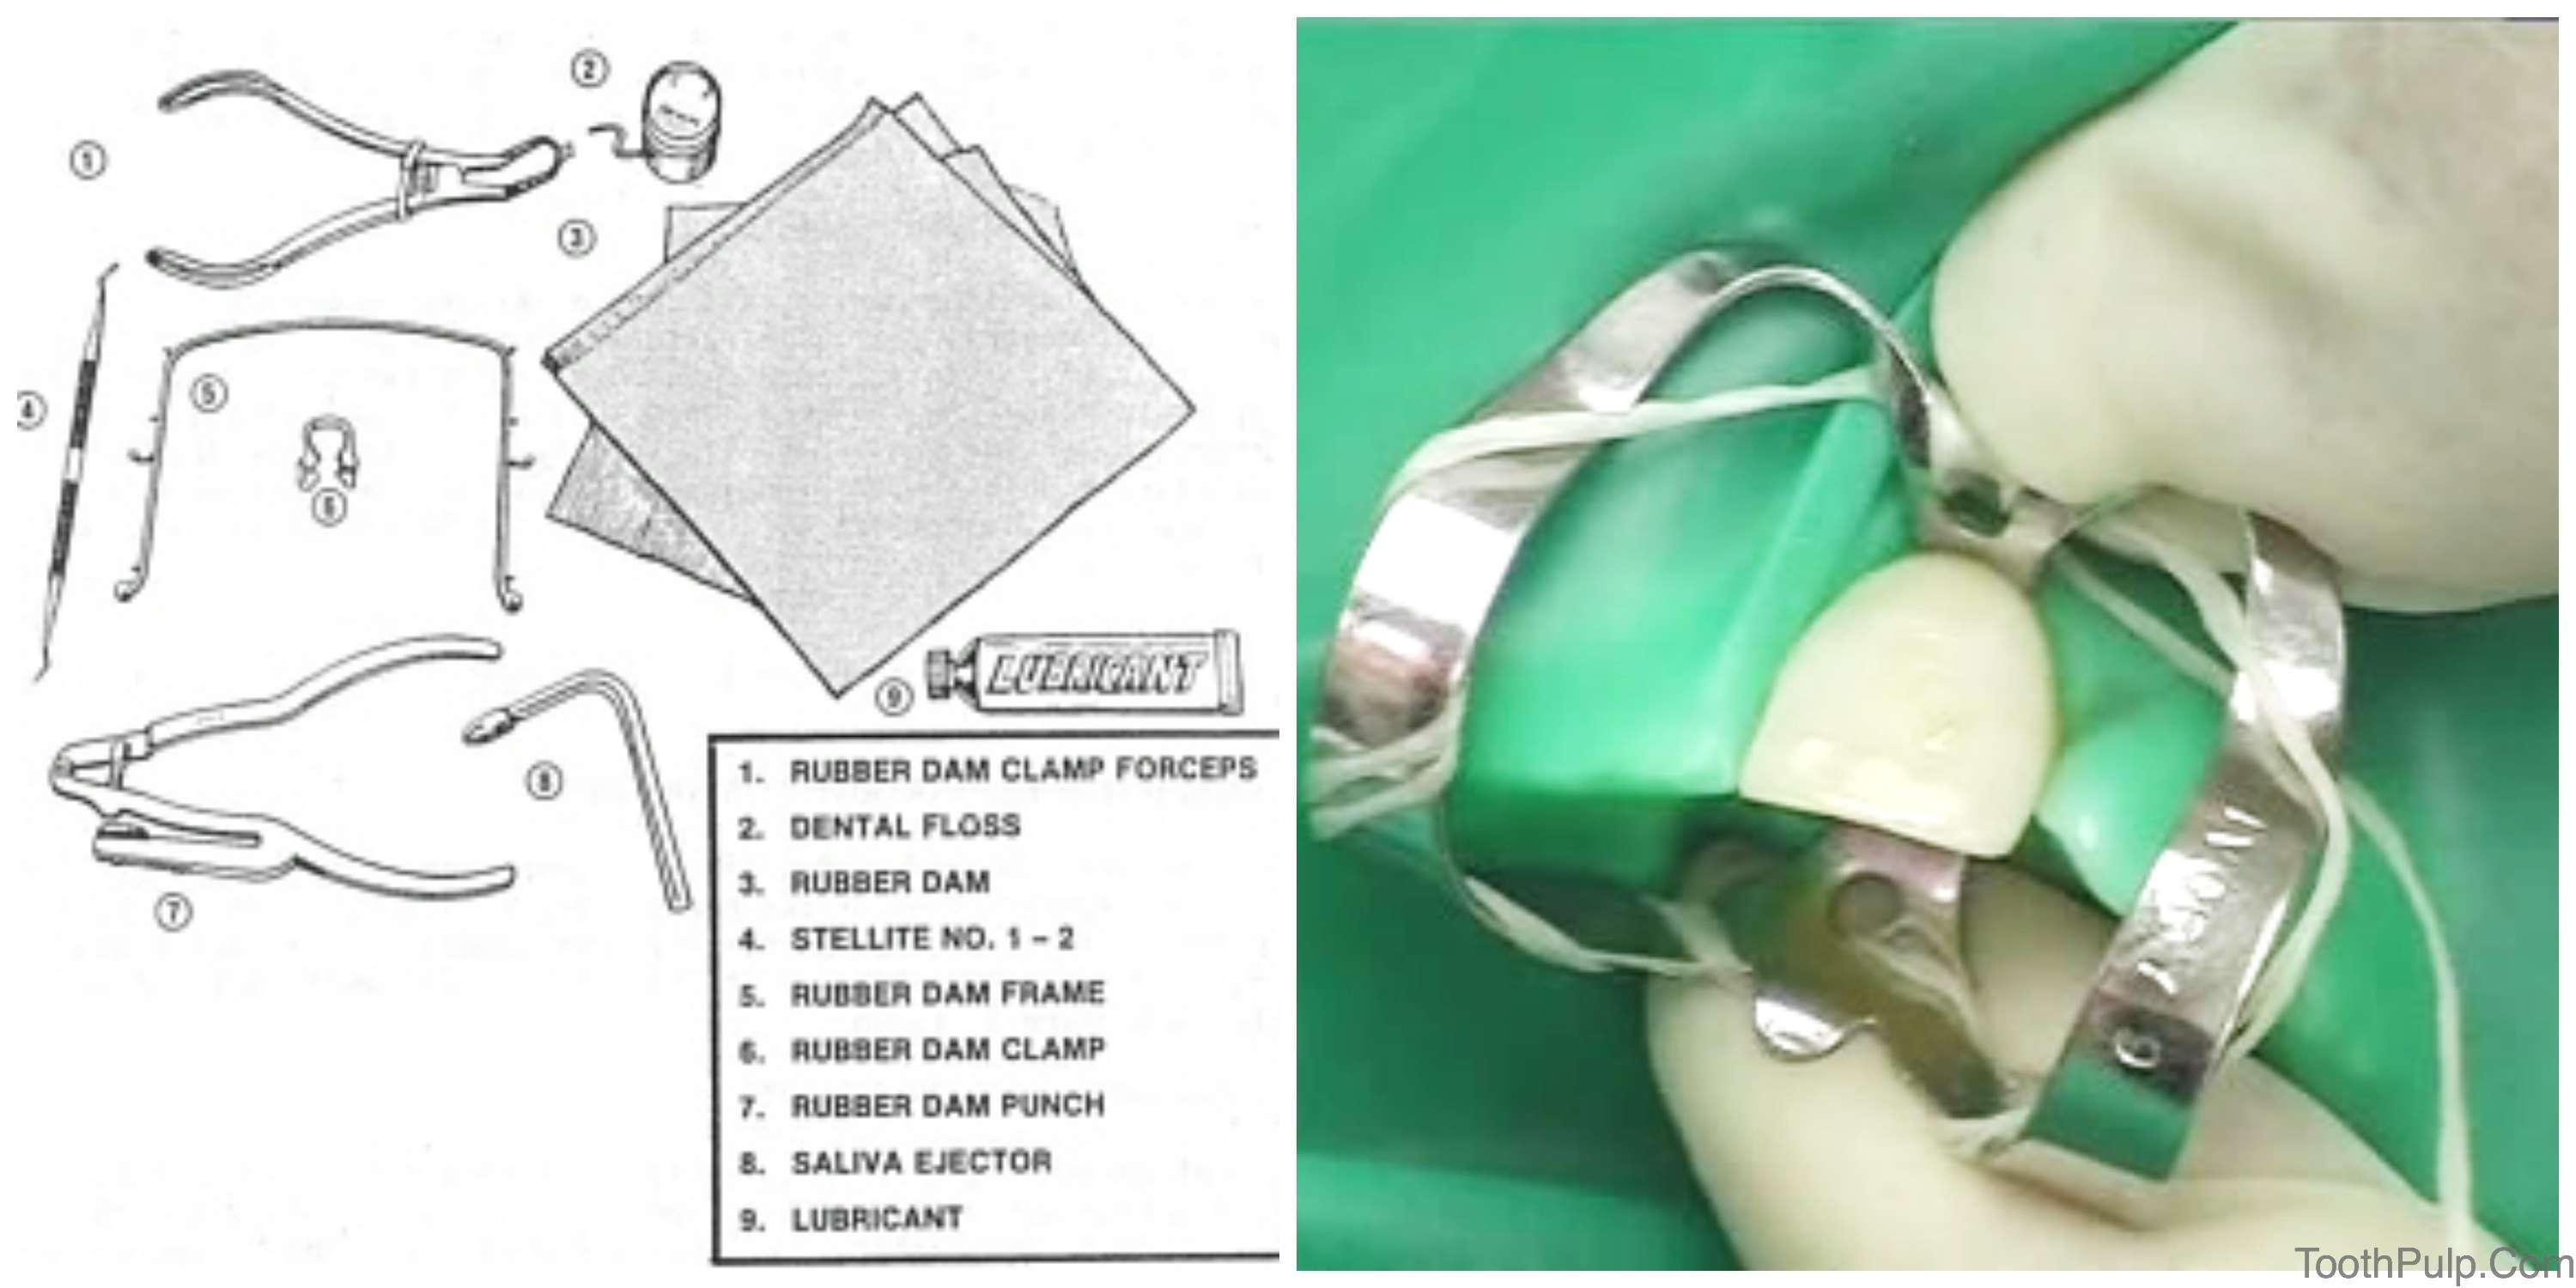
ADVANTAGES OF RUBBER DAM :
The most prominent feature is the isolation of the tooth structure. It prevents the contamination of the prepared canal in the tooth by preventing the entry of saliva and infected tissues. It also improves the performance of the dental materials used in root canal treatment by preventing their contamination by saliva.
After isolation the actual procedures of root canal are initiated.
Step 2. THE OVERVIEW OF ROOT CANAL TREATMENT
In most simple words, root canal treatment involves making an access hole on the crown of the tooth that connects with the pulp canal. After that the cleansing procedure is carried out by removing the infected pulp tissue from the root canal. The basic overview can be explained as follows :
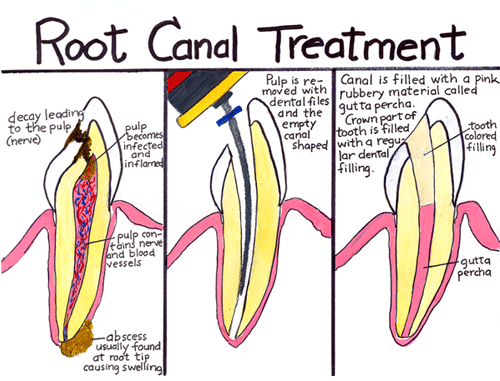
The steps in Root Canal Therapy can be named as follows :
- Creating the access cavity ( To gain access to the infected pulp and create a way to remove the infected pulp tissue )
- Measuring the length of the tooth ( To measure the canal length so that correct length of canal files can be used to prepare and widen the root canal )
- Cleaning & Shaping the Root Canal Followed by Tooth Irrigation ( After determining the correct length of the canal files to be used, shaping of the canal is carried out to widen the canal so that infected pulp tissue can be removed and also irrigating solutions can be injected in to the canal to carry out disinfection )
- Sealing the tooth ( Packing the cleaned canal with sealing materials )
Step 3.Creating the access cavity
 For a better idea about the access cavity preparation and root canal procedure in general you need to know the basic structure of tooth. The tooth has an outer layer called Enamel covering the inner portion dentin. At the center of the tooth there is the pulp that the dentist wants to remove. So the idea is to make a hole in enamel and dentin till the pulp chamber, so that dentist can remove the infected pulp by instrumentation and remove it.
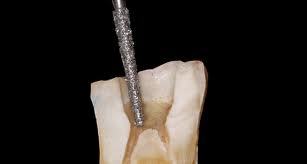
As a first step, your dentist needs to gain access to the infected pulp. For this they will :
Drill the surface of the tooth to make a wide hole that can extend a passage from the surface till the pulp chamber of the tooth. This access cavity exposes the roof of the pulp chamber.
Then the dentist perforates the roof of the pulp chamber to make a direct passage to the pulp of the tooth .
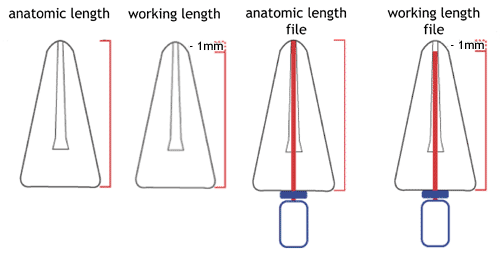
Measuring The Tooth :
After access cavity is prepared the next work is to measure the exact length of the root canal. After determining the exact length of the canal, instruments of the exact size is used to remove the infected pulp tissue.
As a consumer/patient you must know that
Your dentist’s goal will be to treat the entire length of your tooth’s nerve space but not beyond.
The technical terms might be little confusing for you. So we will try to explain you the measuring steps in the most simple manner. The calculation of the root length is carried out using x-ray and electric pulp canal length instruments. For your simple understanding :
Suppose the length of your tooth from the tip to the end of the canal is X then the extent till which the dentist should insert the root canal instruments and file is ( X – 1 )
X = Actual Length of the Tooth till Root Canal End
X – 1 = Length till which the the dentist is allowed to do the canal treatment = Working Length
In case of multi-rooted tooth measurement is done for each of the root separately.
See Next Slide : Step No.4 – Cleaning & Shaping The Tooth
Step.4-CLEANING AND SHAPING THE ROOT CANAL OF THE TOOTH
The next step is to clean and disinfect the inside of the tooth by removing the infected pulp and cleansing the canals.
What is Shaping of the Canals ?
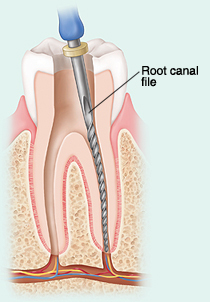 Shaping of the canal refers to the widening of the canal width of the tooth by using instruments in a sequential manner. The idea here is to make adequate space for the instruments to enter the canal and remove the infected pulp. Also the widened canals act as a passage for the irrigation fluids to flush the canals and the pulp chamber.
The dentist needs to do the shaping in a controlled manner. Excess of shaping will lead to excess widening of the canals that will make the tooth structure weak.
Instruments Used For Cleaning And Shaping:
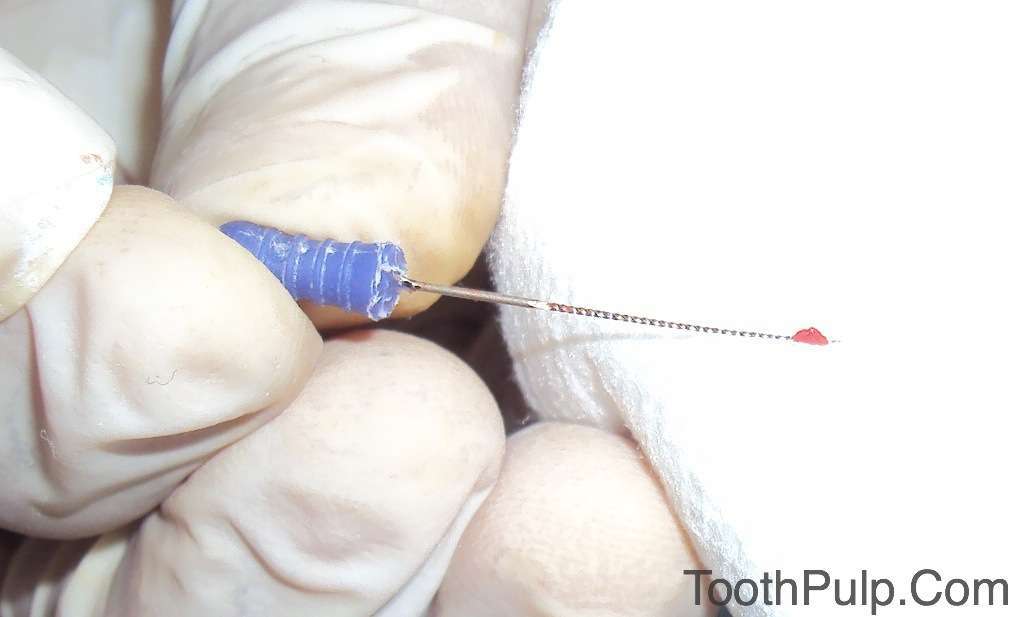
Root Canal Files : are surgical instruments used by dentists when performing root canal treatment. These tools are particularly used to clean and shape the root canal, with the concept being to perform complete chemomechanical debridement of the root canal to the length of the apical foramen.
Files are commonly made from metal; usually stainless steel or nickel titanium alloy. Files may be made from metal blanks that are twisted or machined to produce various sizes and tapers. Typical file lengths are 21mm, 25mm, 31mm. An ISO sizing system is used to describe the tip size of endodontic files. Files are usually colour-coded in an ISO colour system to aid the dentist. Typically steel files have 2% tapers, but in recent years Ni-Ti files with up to 12% tapers have been popularized.
Also widening the canal gives proper access to the dentist to remove the infected pulp tissue. That’s the basic of the root canal procedure. Infected pulp tissue acts as the foci of infection and gradually involves the entire pulp chamber.
Shaping the canal by instruments provides passage for the irrigation solutions like sodium hypochlorite (NaOCl) to cleanse the entire pulp chamber by killing the microorganisms by the action of effervescence.
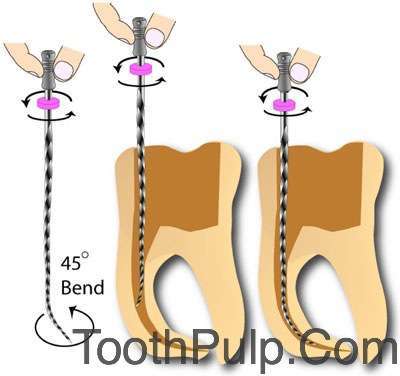
HOW ARE FILES USED ?
- A dentist will work a file up and down, with a twisting motion.
- This action scrubs, scrapes and shaves the sides of the canal, thus cleaning and shaping it.
- Your dentist might use several files of various sizes.
See Next Slide : Step.5 – Tooth Irrigation
TOOTH IRRIGATION
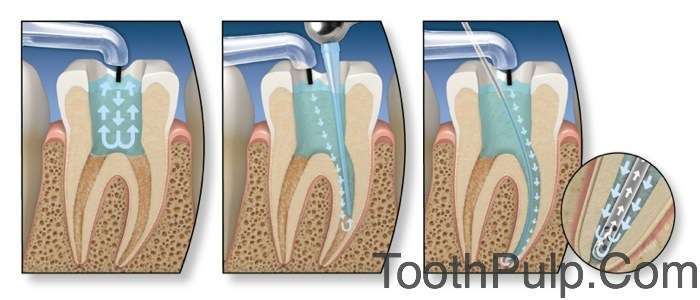
During the entire process of root canal the dentist will regularly keep injecting the canals and the pulp chambers with irrigating solutions that disinfect the canal and the pulp chamber by killing the microbes and removing the debris produced during widening of the canal.
STEP.6-SEALING THE TOOTH
The final step in the root canal procedure is sealing the canals and the pulp chamber with inert, non allergic disinfectant material. After the cleaning and shaping there are two options for the dentist
- To immediately placing the filling material in to the root canal
- Few cases they might prefer to wait at least a week to see the response of the tooth and then placing the filling in the canal & pulp chamber.
WHAT ARE THE TYPES OF THE SEALING MATERIALS ?
With dentistry improving with time many sealing materials have been developed. The most commonly used and time tested sealing material is Gutta Percha . It comes in preformed cones whose sizes exactly match the dimensions (diameter, taper) of root canal files. After the complete cleaning of the pulp chamber and the root canals the sealing materials are compacted by using manual pressure and heat. The idea is to completely seal the pulp chamber and the canal leaving no space and void.
Advantages of sealing the Canals
The area becomes completely sealed off from external irritants and microbes. Gutta Percha is inert in nature and does not promote the growth of microbes on it.
The pain in tooth is always because of the infected pulp ( pulp is rich in nerves ). Now by the end of the root canal treatment the infected and the residual pulp tissues have been removed completely. That means all the nerve fibers, that were causing the pain are now removed. The empty pulp chamber and the root canals are now completely filled with sealing materials that fill the space and stops any chance of future infection.
One thing for you to know as a consumer is
The Root Canal Treatment is meant to be restricted only in your teeth. That’s why the dentist measures the tooth using instruments as we have explained before in the article. The gutta percha cones that dentist uses to seal the canals and the pulp chamber must not extrude out of the canal as shown in this Post RCT X-Ray .
You can see in the x-ray that in RCT of one tooth the gutta percha cones have projected outside the tooth. So, once the dentist says that RCT is over, you must check for this fact in the post RCT x-ray.
It MUST NOT happen as it can cause future complications.
CONCLUSION
In this post we tried to explain you, all the steps about root canal procedure without being too technical. Now you know what happens during the root canal treatment. So, the next time you visit your dentist for treatment, you now know what to expect.


